The K9HV was purchased pre used so I inspected it through before mounting it. The picture above shows my first setup that was able to spin the motor. The controller in the picture was the first prototype of Motoc - SR250V500A that will be developed to feed Corolla's motor. This setup got the motor to spin nicely.
A closer look to the bearings revealed a worn bearing housing. The smaller diameter axle side of the motor had about 0.5mm play between the bearing and the bearing housing. This was going to be fixed.
The motor's rear flange was removed so that the bearing housing could be repaired. The ball bearing seemed ok, but it got replaced with a new one just in case.
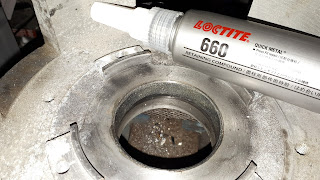
Cleaning the bearing housing revealed clear signs of wearing. Reviewing different methods to fix the worn bearing housing, I decided to purchase a bottle of Loctite 660 from eBay and give it a try. First I punched some marks in the worn bearing housing to help aligning the new bearing better in the center. Then I applied plenty of Loctite 660 into the bearing housing before mounting a new ball bearing into its place. Carefully removed the excess Loctite so it wont get in the bearing, I think I got it fixed :) After a couple of days I checked the result and there is now a new bearing installed without any play on its bearing housing, success!
My next challenge was to mount Corolla's old flywheel into the motor shaft. That turned out to be easy as I only had to purchase a 1210 taper lock bush with a suitable bore to K9HV's shaft. www.bearingboys.co.uk had just what I needed once again!
With a new taper lock bush I got my old flywheel mounted and I decided to check how it was aligned. Measuring from the clutch plate surface I got nearly 0,3mm difference on one full rotation. I concidered this as too much so I gently sanded the taper lock bush so that it would compensate the alignment error. After a few trial and errors I settled with and error of 0,06mm. This step is done:)
Last but not least it was time to balance the motor with its flywheel on the shaft. With first rotations it became clear that there was some imbalance that could provide uncomfortable vibrations. As this motor will be rotated close to 2x higher speeds that its predecessor I was ready to offer some time to get the flywheel balanced.
The balancing method used was very simple trial and error, using neodymium magnets on the flywheel and determining where to drill off some material to improve the balance. Having drilled four quite big holes I could no longer determine any improvement so I considered the balancing step done. While balancing with this method I had some flying magnets in my garage when I rotated the motor too high. Although handy to use, I would not recommend using magnets this way for balancing flywheels due to safety.
Now the motor was rotating nicely up to very high speeds, so I am ready to start fitting the motor into Corolla's gearbox :)


No comments:
Post a Comment